반응형
xml 파일에 ui를 구성하다보면 반복되는 edittext나 button 들이 있다.
깔끔한 코딩과 재사용성을 높힌 커스텀 위젯을 만들어보자.
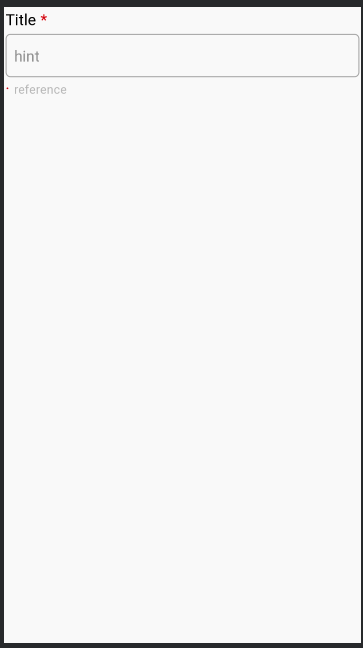
결과
<?xml version="1.0" encoding="utf-8"?>
<LinearLayout xmlns:android="http://schemas.android.com/apk/res/android"
    android:orientation="vertical" android:layout_width="match_parent"
    android:layout_height="match_parent"
    android:layout_margin="2sp">

    <LinearLayout
        android:id="@+id/mor_et_title_linearLayout"
        android:layout_width="match_parent"
        android:layout_height="wrap_content"
        android:orientation="horizontal"
        android:layout_marginBottom="5sp">

        <TextView
            android:id="@+id/mor_et_title"
            android:layout_width="wrap_content"
            android:layout_height="wrap_content"
            android:textSize="18sp"
            android:textColor="@android:color/black"
            android:text="Title"/>
        <TextView
            android:id="@+id/mor_title_need"
            android:layout_width="wrap_content"
            android:layout_height="wrap_content"
            android:textSize="18sp"
            android:textColor="@android:color/holo_red_dark"
            android:layout_marginLeft="5dp"
            android:text="*"/>
    </LinearLayout>


    <EditText
        android:id="@+id/mor_et_edittext"
        android:layout_width="match_parent"
        android:layout_height="50sp"
        android:background="@drawable/mor_edittext_border"
        android:paddingLeft="10dp"
        android:singleLine="true"
        android:hint="hint"/>

    <LinearLayout
        android:id="@+id/mor_et_reference_linearLayout"
        android:layout_width="match_parent"
        android:layout_height="wrap_content"
        android:orientation="horizontal">
        <TextView
            android:id="@+id/mor_reference_need"
            android:layout_width="wrap_content"
            android:layout_height="wrap_content"
            android:textSize="18sp"
            android:textColor="@android:color/holo_red_dark"
            android:textAlignment="center"
            android:gravity="center"
            android:layout_marginRight="5dp"
            android:text="·"/>
        <TextView
            android:id="@+id/mor_et_reference"
            android:layout_width="match_parent"
            android:layout_height="wrap_content"
            android:textColor="#BEBEBE"
            android:text="reference"/>
    </LinearLayout>


</LinearLayout>
- 우선 최종본이다 , textview / edittext / textview 순으로 제목/ 내용쓰는곳 /간단한 설명을 상황에따라 문구를 수정할수 있는 edittext 위젯을 만들것이다.
1.속성정의
<resources>
    <declare-styleable name="morET">
        <attr name="bg" format="reference|integer" />
        <attr name="symbol" format="reference|integer" />
        <attr name="title" format="reference|string" />
        <attr name="placeholder" format="reference|string" />
        <attr name="belowExplain" format="reference|string" />
        <attr name="textColor" format="reference|integer" />
        <attr name="editable" format="reference|boolean" />
    </declare-styleable>
</resources>
수정하려는 부분을 name에 정의 해놓으면
    <com.han.testkotlin.CustomView.MorEditText
        android:id="@+id/first_moreditText"
        android:layout_width="match_parent"
        android:layout_height="wrap_content"
        app:title = "타이틀입니다."
        app:placeholder = "my hint"
        app:belowExplain = "surname과 "/>
이런식으로 사용이 가능하다.
2.커스텀 위젯 클래스 만들기
class MorEditText :LinearLayout {

//    속성 : bg           타입 : integer
//    속성 : symbol       타입 : integer
//    속성 : title        타입 : string
//    속성 : placeholder  타입 : string
//    속성 : belowExplain 타입 : string
//    속성 : textColor    타입 : integer
//    속성 : editable     타입 : boolean

    constructor(context: Context?) : super(context) {
        initLayout()
    }
    constructor(context: Context?, attrs: AttributeSet?) : super(context, attrs) {
        initLayout()
        if (attrs != null) {
            getAttrs(attrs)
        }
    }
    constructor(context: Context?, attrs: AttributeSet?, defStyleAttr: Int) : super(
        context,
        attrs,
        defStyleAttr
    ){
        initLayout()
        if (attrs != null) {
            getAttrs(attrs,defStyleAttr)
        }
    }


    private fun initLayout() {
        LayoutInflater.from(context).inflate(R.layout.mor_edittext, this, true)
    }

    private fun getAttrs(attrs : AttributeSet) {
         val typedArray = getContext().obtainStyledAttributes(attrs,R.styleable.morET ) as TypedArray

        setTypeArray(typedArray);
    }


    private fun getAttrs(attrs : AttributeSet,defStyle:Int) {
        val typedArray = getContext().obtainStyledAttributes(attrs, R.styleable.morET, defStyle, 0) as TypedArray
        setTypeArray(typedArray);

    }

    private fun setTypeArray( typedArray:TypedArray) {

        //Title
        val strTitle = typedArray.getString(R.styleable.morET_title)
        if (strTitle != null){
            mor_et_title_linearLayout.visibility = View.VISIBLE
            mor_et_title.setText(strTitle)
        } else {
            mor_et_title_linearLayout.visibility = View.GONE
            mor_et_title.setText("")
        }


        //Hint
        val strHint = typedArray.getString(R.styleable.morET_placeholder)
        if (strTitle != null){
            mor_et_edittext.setHint(strHint)
        } else {
            mor_et_edittext.setHint("")
        }


        //reference
        val strRef = typedArray.getString(R.styleable.morET_belowExplain)
        if (strRef != null){
            mor_et_reference_linearLayout.visibility = View.VISIBLE
            mor_et_reference.setText(strRef)
        } else {
            mor_et_reference_linearLayout.visibility = View.GONE
            mor_et_reference.setText("")
        }


        typedArray.recycle();
    }

    fun setMor_et_title(s:String){
        mor_et_title.setText(s)
    }

    fun setmor_reference_need(s:String){
        mor_reference_need.setText(s)
    }

    fun setmor_et_edittext(s:String){
      mor_et_edittext.setText(s)
    }

    fun getmor_et_edittext():String{
        return mor_et_edittext.text.toString()
    }

}
- 이전에 android 자체적으로 생성되어있는 widget들도 이런식으로 생성자를 거처 생성된다.
- initLayout : 커스텀할 layout을 inflater로 가저와 지정해준다.
- setTypeArray에 typeArray.getString(위쪽)에서는 app:title = "text"(아래쪽)이라고 할때 text를 String 값으로 리턴해준다.
- string 값으로 리턴해준 이유는 이전 declare-stleable 에 format 부분을 "reference|string"지정했기 때문이다
<attr name="title" format="reference|string" />
- 이제 return값을 실제 위젯이랑 연결 시켜준다 TextView.setText( return값)
- 지정해준뒤에는 재사용을 위해 typedArray.recycle()을 해줘야한다.
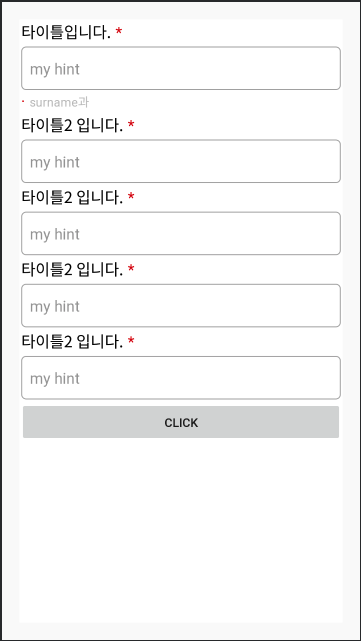
3.사용해보기
<?xml version="1.0" encoding="utf-8"?>
<LinearLayout xmlns:android="http://schemas.android.com/apk/res/android"
    xmlns:app="http://schemas.android.com/apk/res-auto"
    android:orientation="vertical"
    android:layout_width="match_parent"
    android:layout_height="match_parent"
    android:background="@android:color/white"
    android:layout_margin="20sp">

    <com.han.testkotlin.CustomView.MorEditText
        android:id="@+id/first_moreditText"
        android:layout_width="match_parent"
        android:layout_height="wrap_content"
        app:title = "타이틀입니다."
        app:placeholder = "my hint"
        app:belowExplain = "surname과 "/>

    <com.han.testkotlin.CustomView.MorEditText
        android:layout_width="match_parent"
        android:layout_height="wrap_content"
        app:title = "타이틀2 입니다."
        app:placeholder = "my hint"/>

    <com.han.testkotlin.CustomView.MorEditText
        android:layout_width="match_parent"
        android:layout_height="wrap_content"
        app:title = "타이틀2 입니다."
        app:placeholder = "my hint"/>

    <com.han.testkotlin.CustomView.MorEditText
        android:layout_width="match_parent"
        android:layout_height="wrap_content"
        app:title = "타이틀2 입니다."
        app:placeholder = "my hint"/>


    <com.han.testkotlin.CustomView.MorEditText
        android:layout_width="match_parent"
        android:layout_height="wrap_content"
        app:title = "타이틀2 입니다."
        app:placeholder = "my hint"/>

    <Button
        android:id="@+id/textbtn"
        android:layout_width="match_parent"
        android:layout_height="wrap_content"
        android:text="click"/>
</LinearLayout>
-짧은 코드로 여러개의 custom editetext를 만든것을 볼 수 있다.
반응형
'AOS' 카테고리의 다른 글
| [안드로이드]오늘 하루 안보기 (0) | 2019.12.21 |
|---|---|
| [안드로이드] 위아래가 사라지는 레이아웃 (0) | 2019.12.21 |
| [안드로이드] permission 관련 util (0) | 2019.12.20 |
| [안드로이드]구글인앱결제(정기구독) (0) | 2019.12.20 |
| [안드로이드] 실행중 시스템 언어 변경하기 (0) | 2019.12.20 |